A shiny orb is an effective design to incorporate on your
website or any graphics file. The shinning effect can be made as a button on a
web page to give an attractive link and very professional look. I learned creating
the shiny orb on Corel Draw when I first installed the application on my
computer. It was a tutorial on YouTube and a step by step process on creating
the shiny orb. I also use the orb design as my avatar on various forum sites
and website. Here’s how to create a shiny orb on Corel Draw.
Create a New Corel Document
Create and ellipse
tool at the base of the orb
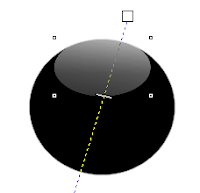
Copy the same object and add another layer. Color the first
object layer 1 Black
and Layer 2 object colorwhite. Adjust it as shown on the
image below
To give it shining effect use the transparency tool
Convert the object to bitmap and add a transparency tool.
Properties Linear Normal
Adjusting the color of the main object will give you a
different effect
A very simple steps
but effective design I hope you can learn and use the design on your website. You
can also visit my other Corel Draw Tutorial like ID layout.


No comments:
Post a Comment