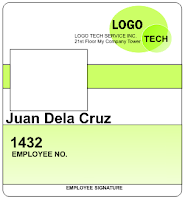
An ID or Identification Card contains company information,
your name, address and contact. It’s a very important document to know your
identity and validate that you're part of the company, schools or organization.
I will show you how to create a front ID
layout using Corel Draw.
No exact size on the tutorial as ID vary on style and
preference by the user. Create a CorelDraw document. Name Layer 1 as Layout then
create a rectangle object
this will be the main size of the ID. Using the shape
tool put a shape or curve on the object.  |
| Shape tool |
Add another layer and name it Design for the ID picture box
and design. Create a square object shape for the picture box you can put it on
the middle or left side of the ID.
 |
| layout design and picture box |
Color the Design Layout depends on the company, school or organization
color. In this tutorial I select Green, White and Black. Using the Smart Fill
Tool selects Fill the design and put a transparency effect to highlight the
Layout.
Add another layout
for text, name and other information on ID.
Select an Arial font
for the name and put it under the ID picture box. Add other information like
employee number or student number you can also add a signature line at the
bottom..
 On the upper right
hand corner of the screen a logo or company information can be added. Create a
new layer for logo you can import the logo and adjust the size or create your
own logo on CorelDraw. Creating a Front
ID layout using Corel Draw is easy you can copy the layout of your company
ID or browse the web for ID layout. It’s a basic shape color and design for
Corel you don’t need to master all the tools. Make sure to know the basic
first. Check the finished ID front Layout


No comments:
Post a Comment